Okay, as promised, I am doing some battle reports on my games at Nova Open. I need to get to them as quickly as possible so I don't forget what happened. lol! I'm happily going to rip into myself, as the goal is improve before next year. There were definitely mistakes, especially in the first game, so trying to alleviate those in the future is important. Everyone is welcome to comment as they wish, so long as everything stays respectful. I treat you all with respect, so I expect the same in return. :P
I'll start each report with my opponent's list, then the mission goals and deployment. My list was the same one as the list found on my Army List page, except that the bolter initiates in the Crusade squads actually had BP/CCWs. I simply did not have enough time to paint the bolter dudes. Onwards!
I'll start each report with my opponent's list, then the mission goals and deployment. My list was the same one as the list found on my Army List page, except that the bolter initiates in the Crusade squads actually had BP/CCWs. I simply did not have enough time to paint the bolter dudes. Onwards!
Game One -- Daniel Oppedisano
HQ:
* Asdrubael Vect w/ Dais of Destruction. [440]
* Haemonculus w/ Webway Portal and Casket of Flensing. [95]
ELITES:
* Incubi x8. [176]
TROOPS:
* 9 Wyches w/ Haywire Grenades; 1 Hekatrix w/ Agonizer, Blast Pistol, and Haywire Grenades. [165]
* 9 Wyches w/ Haywire Grenades; 1 Hekatrix w/ Agonizer, Blast Pistol, and Haywire Grenades. [165]
* 9 Wyches w/ Haywire Grenades; 1 Hekatrix w/ Agonizer, Blast Pistol, and Haywire Grenades. [165]
* 9 Wyches w/ Haywire Grenades; 1 Hekatrix w/ Agonizer, Blast Pistol, and Haywire Grenades. [165]
* 9 Wyches w/ Haywire Grenades; 1 Hekatrix w/ Agonizer, Blast Pistol, and Haywire Grenades. [165]
FAST ATTACK:
* Reavers x3 w/ Heat Lance. [78]
* Reavers x3 w/ Heat Lance. [78]
* Reavers x3 w/ Heat Lance. [78]
HEAVY SUPPORT:
* Ravager w/ Flickerfield. [115]
* Ravager w/ Flickerfield. [115]
Total: [2000]
Mission Goals:
P) Objectives
S) Kill Points
T) Table Quarters
Deployment was Pitched Battle.
Deployment is finished!
So the pairings are posted up and I got a pleasant surprise! I was playing Dark Eldar on Table #3. I was on the top tables! Just had to stay there. ;) Dan and I briefly chat before the game, familiarizing ourselves with each other and talking about how the weekend is going thus far for us both. He's a great guy. One of the things that really blew me away was the insane amount of painting skill that went into his army. The guy is an absolute genius, though very modest. I was so distracted by the awesome that was his army (in addition to my 2 hours of sleep the previous night), that I only glanced over his list briefly, noticing the Incubi and the five squads of foot Wyches. I thought: "I've got this in the bag." Then we started rolling dice and my dreams of world domination quickly fell apart.
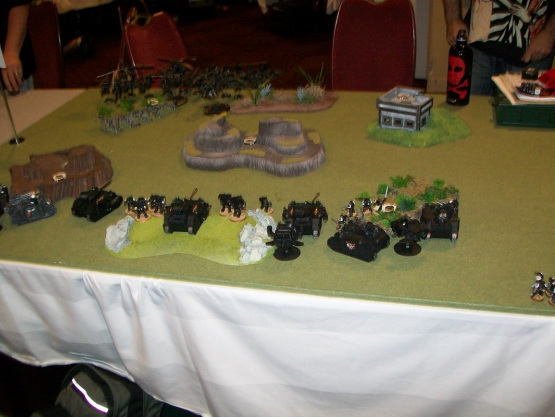
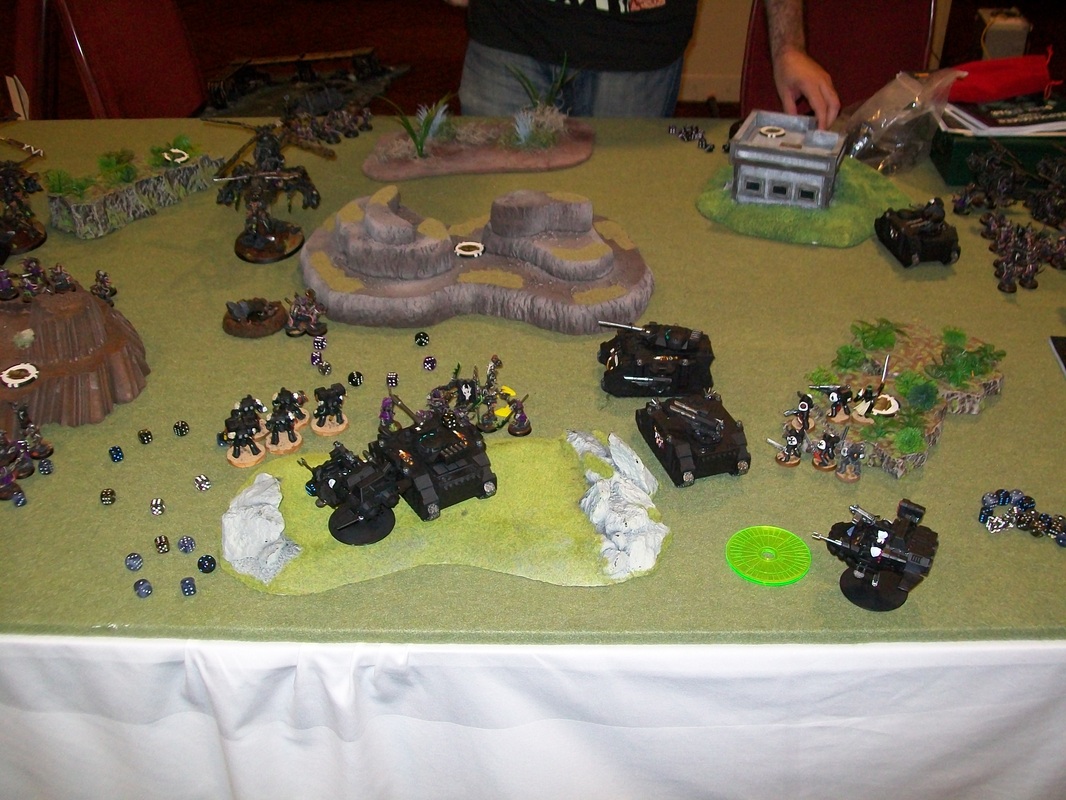
I won the roll and chose to take the first turn. Knowing that if he reserved, he'd have a hell of a time getting across to me with his foot Wyches, so I preferred having the first turn in this case. As you can see above, I deployed left-central to take advantage of the terrain on that side of the board. You'll notice that the entire right side of the board is WIDE OPEN. I didn't want anything to do with that, as he'd just run over and maul me in close combat. I had good fire lanes with pretty much the entire board. Dan didn't seem phased in the slightest by my deployment and proceeded to deploy to the far right of his deployment zone. The finished deployment picture is above.
Then Dan said he was going to try to Seize the Initiative. With sudden horror, I realized that he had Vect and that I had made a terrible mistake. Of course, my mistake was capitalized on and he rolled a 5 to take the first turn from me. He proceeded to advance straight ahead towards me, with his Reavers blasting forward with their Turbo-Boosts. Two squads fly directly towards my left objective, the other flies directly in front of my Terminators and central Predator. He then disembarks his Haemonculus from the Dias of Destruction (leaving the pain token with Vect and Incubi) and drops a webway portal pretty much right in my face. I knew that I lost myself the game in one fell swoop. The Wyches would be running through a WWP and multi-charge my entire army. That'd teach me to not read my opponent's list! Mistake #1. In the shooting phase, he tossed a couple shots into my Land Speeders, but only manages to shake of of them.
I was determined to try and scratch out a win. I knew my left flank was toast, so when my first turn came, I tried to sneak a victory from the crutches of the Skaven-dar. I started by re-aligning my army to account for the direction of the attack. In addition, because the game was objectives, I took a single Razorback on my right flank to sneak around to try and claim his left objective in the building. With his lack of mobility, it was possible. I didn't know how many of the Wyches were going to be coming out of WWP, but I knew whatever came out was bad news for me. So in Mistake #2, I decided to try and blast them as they came out of the portal. Bad idea. In retrospect, I should have moved my Typhoons Flat Out forward to block the WWP and any units that wanted to come out of it. But as i said, I decided to try and shoot them down. In my shooting phase, I killed the Haemonculus for being "that guy" and shot the Reavers in front of me lots and lots of times. I didn't want them to get that close range melta shot on my only heavy armor, since the Terminators wouldn't be able to shoot for long. They stubbornly made pretty much every turbo boost save they had to make, with the 3 man squad finally dying after my army exhausted nearly all of their firepower. I also put some shots down on the Ravagers, but Dan made their Flickerfield saves.
Turn 1 is done!
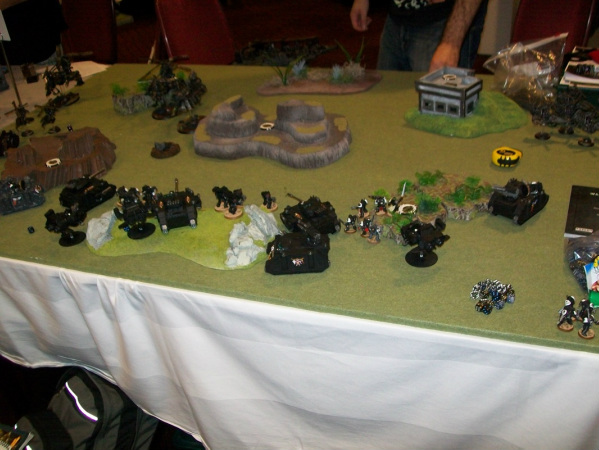
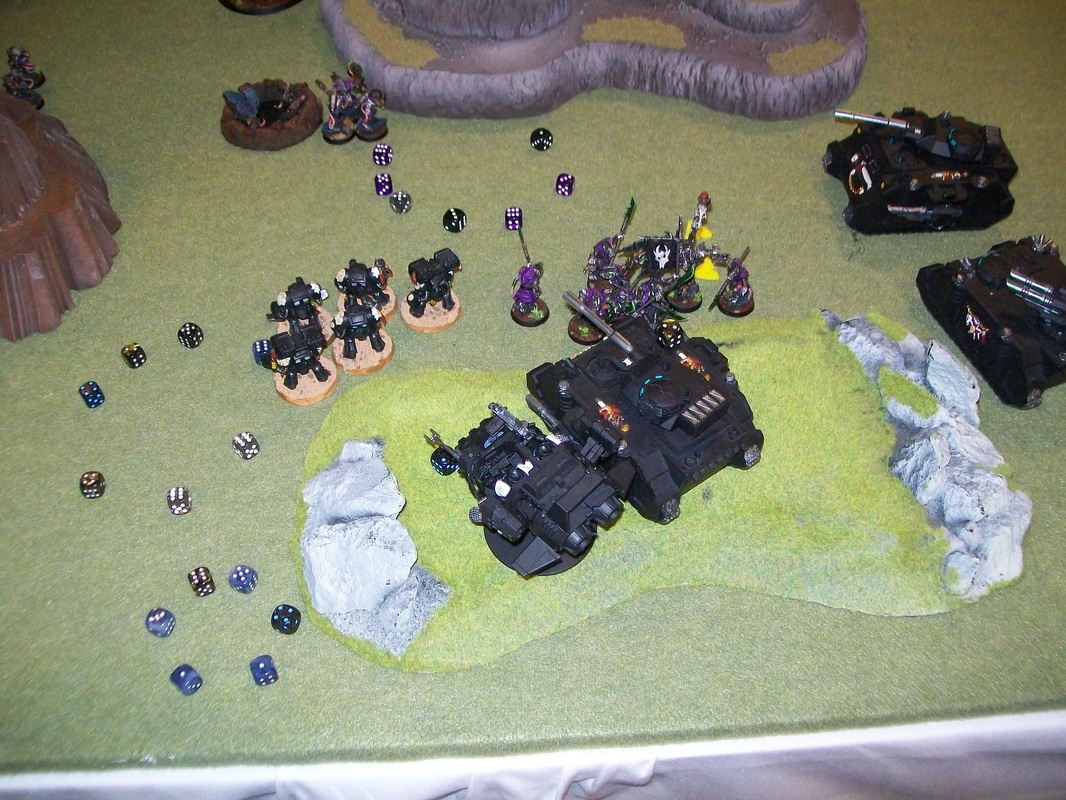
The next picture shows how close that WWP really was to my army and why I realized how big a mistake I had made not reading Dan's list prior to the battle. lol!
I think I'm in trouble...!
On turn two, Dan rolled for reserves and got three units of Wyches. The perfect roll. Now, not only did he have more than enough Wyches to mess with my line, he had a couple units left in reserve to claim objectives later on! When it rains, it pours as they say. Dan brings all three Wych units through the WWP, with one going directly for my Crusader squad-filled Razorback that is claiming the objective on the left side. The other runs at my Predator and the final one starts climbing up the big hill on the left side with the objective on it. In addition, he continues to move his Dias forward and disembarks the squad with a multi-charge in mind. His shooting takes down one of my Typhoons, the left-most Razorback, as well as stunning my left most Predator. However, the explosion kills several of the Wyches nearby.
In his assault phase, he proceeds to attempt a multi-charge with his Vect-led Incubi unit, but fails. However, it doesn't matter as his unit slaughter four of my terminators. But one survives! My Terminator wants revenge, but Vect laughs at him as he makes all of the necessary Shadowfield saves. Elsewhere on the board, he charges my other terminator squad with the "damaged" Wych squad and the Crusader squad that is holding my left objective with another one. Let's just say that the Crusader squad did not fair so well, nor did those Wyches that attacked the Terminators. The victorious Wyches consolidate on their new objective, but in the other combat, I force my opponent to fall back. Because they are below 50% strength, they are out of the game. One less problem!
In his assault phase, he proceeds to attempt a multi-charge with his Vect-led Incubi unit, but fails. However, it doesn't matter as his unit slaughter four of my terminators. But one survives! My Terminator wants revenge, but Vect laughs at him as he makes all of the necessary Shadowfield saves. Elsewhere on the board, he charges my other terminator squad with the "damaged" Wych squad and the Crusader squad that is holding my left objective with another one. Let's just say that the Crusader squad did not fair so well, nor did those Wyches that attacked the Terminators. The victorious Wyches consolidate on their new objective, but in the other combat, I force my opponent to fall back. Because they are below 50% strength, they are out of the game. One less problem!

My game is looking pretty bleak at this point, but I'm quite stubborn. I start moving my very leftmost Razorback (which you can't see, because its behind the left hill) towards my opponent's right objective. In addition, I blast my rightmost Razorback towards his left objective in the same fashion. The theory is to take his objectives and try to hold on to mine as long as possible. I also move up some of my tanks in the attempt to get clearer shots at his vehicles in the attempt to shore up my Kill Points, in case it comes down to that.
Unfortunately, my shooting phase doesn't go as awesome as I'd like. I did manage to kill off another Reaver Jetbike squad and explode the Dias of Destruction, but all of my shots fail to knock those Wyches off my objective. Nor was I able to damage those Ravagers in a meaningful way. The assault phase sees the end of my last terminator and my opponent decides to consolidate towards my Terminators.
Unfortunately, my shooting phase doesn't go as awesome as I'd like. I did manage to kill off another Reaver Jetbike squad and explode the Dias of Destruction, but all of my shots fail to knock those Wyches off my objective. Nor was I able to damage those Ravagers in a meaningful way. The assault phase sees the end of my last terminator and my opponent decides to consolidate towards my Terminators.
The next turn kinda blurs out a little bit. His reserves make it to the table and move towards his objectives. It has him shifting his focus towards my right flank, as I still hold the objective there. Dan's last remaining Reaver Jetbike squad Turbo Boosts to contest my right objective and does a wound to my Crusader squad with the Bladevanes. His shooting, however, is now pretty ineffectual, but does manage to shake my two flanking Razorbacks. His Incubi charges into my Terminators, but we both have terrible rolls so I manage to escape with only one terminator lost. I respond to this by attempting a ram on his leftmost Ravager, but he passes the dodge test. In addition, I move forward with my right Razorback and park its ass onto the objective after making the difficult terrain test. My shooting takes out a couple of Incubi and one Reaver Jetbike. It'll have to do. As it currently stands, we are tied on objectives 1 to 1.
The judge calls over the speaker that we've reached the 15 minute mark and this was the last turn. My opponent continues to consolidate towards the objectives with his Wyches, contesting my newly captured objective and claiming another for himself. He unsuccessfully shoots that Razorback, but charges it and gets a stunned result. At least the guys inside are safe. But still, I won't be able to attempt a Tank Shock now. Yikes! Better pull something out of my ass quick, or else game over. Unfortunately, he is able to kill off the remaining terminators before they can strike back, so my options are growing very thin.
When my turn comes, I take the only two options that can possibly give me a victory and go for it. First, I need to kill those Reaver Jetbikes that are sitting on my objective because there is no way I'd be able to kill a full 10-man Wych squad on the other side of the board. Second, I need to tank shock the Wych squad off Dan's right objective in the corner. Tall order, but not impossible! I position myself for optimal shooting at the Jetbikes first. Then I line up my Tank Shock and declare it! I pass the difficult terrain test and should I not die to a Death or Glory, I'll have sufficiently pushed his unit back far enough to be out of contest range. As expected, he decides to try a Death or Glory using his Wych's haywire grenades. When rolling to find out the result of hit, I cross my fingers and hope for anything but a 6 (which is a penetration with Haywire Grenades). What does he roll? A 6. I'm getting really worried now. One more roll will decide the outcome of the game. Guess what he rolls? Another 6. Blows the Razorback up and kills 3 Marines inside. This means Dan has effectively won, as I have no way to knock off any of the Wyches from the objectives. However, I want to complete the game and see what would have happened with the rest of my turn. So I proceed to fire everything I have into the remaining Reaver Jetbikes and easily kill them off. I even used my remaining shots to try to get a lucky kill on one of the Wych squads to force a moral check, but it didn't happen. We count up the scores and we tied on objectives 1-1, but Dan beats me in Kill Points 11-6. He also took home 3 table quarters to my 1.
Should Dan have not blown up my Razorback with his Haywire grenades, i would have won the game on objectives. But the dice didn't favor me this time. And to be honest, I wasn't disappointed at all. Sure I wanted to win Nova, but I knew it wasn't a realistic goal. I made a HUGE mistake early on in the game and recovered enough to force a couple dice rolls from my opponent that could have meant the win for me. That is all I can ask for. Close games are so much more fun to me. My opponent was great to play against and he did well to capitalize on my mistakes. He definitely deserved the win. :)
Post-game thoughts: First, it is extremely important to make sure that you read your opponent's list before the game starts. After this game, I made extra sure to take my time with it so I wasn't surprised by anything. Had I seen the Vect and WWP combo, I would have given my opponent the 1st turn and refused flanked him as best as I could. Then he'd have to fly all the way across the board the long way, eating my fire on the way over. If the Haemonculus got dropped across the board, all of those Wyches would have been irrelevant to the game. And likely much of the rest of his list, as it was really not very mobile at all. Lesson learned: Do not drool at your opponent's armies. ;)
The other big thing that I would say that I made a mistake on and would change is not rely so heavily on shooting to get things done. As you'll notice in my other battle reports, this actually happens gradually more and more. But my over-reliance cost me some games, that's for sure. I should have known better, especially considering the amount of cover on the board.
Also, my target priority was a little whacked. Things that are so ingrained into my normal thinking was kind of dulled for this game due to my exhaustion (whole another topic). Instead of wasting billions of shots on those Reaver Jetbikes who Turbo-Boosted, I know (but didn't do) that I should have been targeting the Dias of Destruction and the two Ravagers with everything I had. But I didn't. I could have probably done an even better job of stalling the DE advance had I done that. One Heat Lance from ONE unit isn't very scary. Sure it might kill something, but then that unit dies the next turn because they have terrible saves. Oh well. I warmed up a little bit by the end of this game, so I wasn't so clueless in Game Two.
 RSS Feed